If your website has more than a handful of pages,
you'll probably want some sort of navigation system to let users move
from one page to the next. Obviously, you can use the ASP.NET toolkit of
controls to implement almost any navigation system, but this requires
that you perform all the hard work. Fortunately, ASP.NET has a set of navigation features that can simplify the task dramatically.
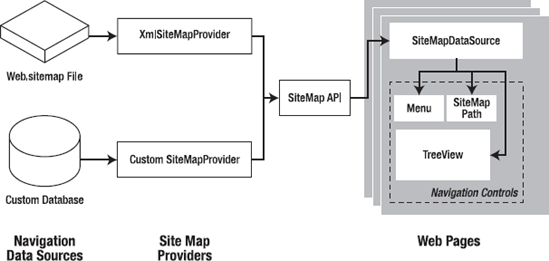
As with all the best ASP.NET features, ASP.NET
navigation is flexible, configurable, and pluggable. It consists of
three components:
A way to define the navigational structure of
your website. This part is the XML site map, which is (by default)
stored in a file.
A convenient way to
read the information in the site map file and convert it to an object
model. The SiteMapDataSource control and the XmlSiteMapProvider perform
this part.
A way to use the site map
information to display the user's current position and give the user the
ability to easily move from one place to another. This part takes place
through the navigation controls you bind to the SiteMapDataSource
control, which can include breadcrumb links, lists, menus, and trees.
You can customize or extend each of these ingredients
separately. For example, if you want to change the appearance of your
navigation controls, you simply need to bind different controls to the
SiteMapDataSource. On the other hand, if you want to read site map
information from a different type of file or from a different location,
you need to change your site map provider.
Figure 1 shows how these pieces fit together.
1. Defining a Site Map
The starting point in site map-based navigation is
the site map provider. ASP.NET ships with a single site map provider,
named XmlSiteMapProvider, which is able to retrieve site map information
from an XML file. If you want to retrieve a site map from another
location or in a custom format, you'll need to create your own site map
provider or look for a third-party solution on the Web.
The XmlSiteMapProvider looks for a file named
Web.sitemap in the root of the virtual directory. Like all site map
providers, the task of the XmlSiteMapProvider is to extract the site map
data and create the corresponding SiteMap object. This SiteMap object
is then made available to the SiteMapDataSource, which you place on
every page that uses navigation. The SiteMapDataSource provides the site
map information to navigation controls, which are the final link in the
chain.
|
To simplify the task of adding navigation to your website, you can use master pages.
That way, you simply need to place the SiteMapDataSource and navigation
controls on the master page, rather than on all the individual pages in
your website.
|
|
You can create a site map using a text editor such as Notepad, or you can create it in Visual Studio by selecting Website =>
Add New Item and then choosing the Site Map option. Either way, it's up
to you to enter all the site map information by hand. The only
difference is that if you create it in Visual Studio, the site map will
start with a basic structure that consists of three siteMap nodes.
Before you can fill in the content in your site map
file, you need to understand the rules that all ASP.NET site maps must
follow. The following sections break these rules down piece by piece.
NOTE
Before you begin creating site maps, it helps to
have a basic understanding of XML, the format that's used for the site
map file. You should understand what an element is, how to start and end
an element, and why exact capitalization is so important.
1.1. Rule 1: Site Maps Begin with the <siteMap> Element
Every Web.sitemap file begins by declaring the
<siteMap> element and ends by closing that element. You place the
actual site map information between the start and end tags (where the
three dots are shown here):
<siteMap xmlns="http://schemas.microsoft.com/AspNet/SiteMap-File-1.0">
    ...
</siteMap>
The xmlns attribute is required, and must be entered
exactly as shown here. This tells ASP.NET that the XML file uses the
ASP.NET site map standard.
1.2. Rule 2: Each Page Is Represented by a <siteMapNode> Element
So, what does the site map content look like?
Essentially, every site map defines an organization of web pages. To
insert a page into the site map, you add the <siteMapNode> element
with some basic information. Namely, you need to supply the title of
the page (which appears in the navigation controls), a description
(which you may or may not choose to use), and the URL (the link for the
page). You add these three pieces of information using three attributes.
The attributes are named title, description, and url, as shown here:
<siteMapNode title="Home" description="Home" url="~/default.aspx" />
Notice that this element ends with the characters />. This indicates it's an empty element that represents a start tag and an end tag in one. Empty elements never contain other nodes.
Here's a complete, valid site map file that uses this page to define a website with exactly one page:
<siteMap xmlns="http://schemas.microsoft.com/AspNet/SiteMap-File-1.0">
    <siteMapNode title="Home" description="Home" url="~/default.aspx" />
</siteMap>
Notice that the URL for each page begins with the ~/
character sequence. This is quite important. The ~/ characters represent
the root folder of your web application. In other words, the URL
~/default.aspx points to the default.aspx file in the root folder. This
style of URL isn't required, but it's strongly recommended, because it
makes sure you always get the right page. If you were to simply enter
the URL default.aspx without the ~/ prefix, ASP.NET would look for the
default.aspx page in the current folder. If you have a web application with pages in more than one folder, you'll run into a problem.
For example, if the user browses into a subfolder and
clicks the default.aspx link, ASP.NET will look for the default.aspx
page in that subfolder instead of in the root folder. Because the
default.aspx page isn't in this folder, the navigation attempt will fail
with a 404 Not Found error.
1.3. Rule 3: A <siteMapNode> Element Can Contain Other <siteMapNode> Elements
Site maps don't consist of simple lists of pages.
Instead, they divide pages into groups. To represent this in a site map
file, you place one <siteMapNode> inside another. Instead of using
the empty element syntax shown previously, you'll need to split your
<siteMapNode> element into a start tag and an end tag:
<siteMapNode title="Home" description="Home" url="~/default.aspx">
    ...
</siteMapNode>
Now you can slip more nodes inside. Here's an example where a Home group contains two more pages:
<siteMapNode title="Home" description="Home" url="~/default.aspx">
    <siteMapNode title="Products" description="Our products"
      url="~/products.aspx" />
    <siteMapNode title="Hardware" description="Hardware choices"
      url="~/hardware.aspx" />
</siteMapNode>
Essentially, this represents the hierarchical group of links shown in Figure 2.

In this case, all three nodes are links. This means
the user could surf to one of three pages. However, when you start to
create more complex groups and subgroups, you might want to create nodes
that serve only to organize other nodes but aren't links themselves. In
this case, just omit the url attribute, as shown here with the Products
node:
<siteMapNode title="Products" description="Products">
    <siteMapNode title="In Stock" description="Products that are available"
      url="~/inStock.aspx" />
    <siteMapNode title="Not In Stock" description="Products that are on order"
      url="~/outOfStock.aspx" />
</siteMapNode>
When you show this part of the site map in a web page, the Products node will appear as ordinary text, not a clickable link.
No limit exists for how many layers deep you can nest
groups and subgroups. However, it's a good rule to go just two or three
levels deep; otherwise, it may be difficult for users to grasp the
hierarchy when they see it in a navigation control. If you find that you
need more than two or three levels, you may need to reconsider how you
are organizing your pages into groups.
1.4. Rule 4: Every Site Map Begins with a Single <siteMapNode>
Another rule applies to all site maps. A site map
must always have a single root node. All the other nodes must be
contained inside this root-level node.
That means the following is not a valid site map, because it contains two top-level nodes:
<siteMapNode title="Products" description="Our products"
  url="~/products.aspx" />
<siteMapNode title="Hardware" description="Hardware choices"
  url="~/hardware.aspx" />
The following site map is valid, because it has a single top-level node (Home), which contains two more nodes:
<siteMap xmlns="http://schemas.microsoft.com/AspNet/SiteMap-File-1.0">
    <siteMapNode title="Products" description="Our products"
      url="~/products.aspx" />
    <siteMapNode title="Hardware" description="Hardware choices"
      url="~/hardware.aspx" />
</siteMap>
As long as you use only one top-level node, you can nest nodes as deep as you want in groups as large or as small as you want.
1.5. Rule 5: Duplicate URLs Are Not Allowed
You cannot create two site map nodes with the same
URL. This might seem to present a bit of a problem in cases where you
want to have the same link in more than one place—and it does. However,
it's a requirement because the default SiteMapProvider included with
ASP.NET stores nodes in a collection, with each item indexed by its
unique URL.
This limitation doesn't prevent you from creating
more than one URL with minor differences pointing to the same page. For
example, the following two nodes are acceptable, even though they lead
to the same page (products.aspx), because the two URLs have different
query string arguments at the end:
<siteMapNode title="In Stock" description="Products that are available"
  url="~/products.aspx?stock=1" />
<siteMapNode title="Not In Stock" description="Products that are on order"
  url="~/products.aspx?stock=0" />
This approach works well if you have a single page
that will display different information, depending on the query string.
NOTE
The URL in the site map is not case sensitive.